
Windows 10 : Hyper V 활성화-방법은 다음과 같습니다
Windows 10에서 Hyper V를 활성화하면 가상 시스템을 생성하고 VirtualBox 또는 VMware와 같은 특수 소프트웨어를 저장할 수 있습니다. 이 기능은 세 가지 방법으로 켤 수 있습니다.
Windows 10에서 Hyper V 활성화 : 요구 사항
Windows 10이 설치된 모든 컴퓨터가 가상화에 적합한 것은 아닙니다. 반면 Hyper V는 다음 요구 사항을 충족하는 장치에서만 활성화 할 수 있습니다.
- 운영 체제 : Windows 10 Pro, Enterprise 또는 Education
- RAM : 4GB RAM 이상
- 프로세서 : SLAT (second-level address translation)가있는 64 비트 CPU 및 VM 모니터 모드 확장 지원 (Intel CPU의 경우 "VT-c")
Windows 10 : Windows 기능으로 Hyper V 활성화
PC가 위의 요구 사항을 충족하면 Windows 기능을 사용하여 Hyper V를 켤 수 있습니다.
- 실행 대화 상자가 열리도록 [Windows] + [R] 키 조합을 누르십시오.
- 새 창에서 "옵션 기능"명령을 입력하고 [Enter]로 확인하십시오.
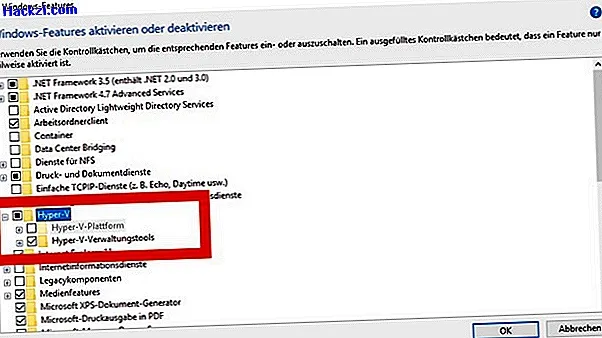
- 새 창에서 "Hyper-V"항목을 활성화하고 "확인"을 클릭하십시오.
- 그런 다음 프로그램에서 Hyper-V 관리자를 찾습니다. 도구를 시작하면 첫 번째 가상 머신을 설정할 수 있습니다.
또는 PowerShell을 통해 Hyper V를 켭니다.
실행 대화 상자를 사용하는 대신 Windows 10에서 PowerShell을 사용하여 Hyper V를 활성화 할 수도 있습니다.
- [Windows] + [X] 키 조합을 누르고 컨텍스트 메뉴에서 "Windows PowerShell (관리자)"항목을 선택하십시오.
- 사용자 계정 컨트롤에 대한 경고가 표시되면 "예"로이를 확인하여 PowerShell을 시작하십시오.
- 새 창에서 "Enable-WindowsOptionalFeature -Online -FeatureName Microsoft-Hyper-V -All"명령을 입력하고 [Enter]로 확인하십시오.
- 컴퓨터에서 Hyper V가 활성화되었습니다.
다른 대안 : DISM을 통해 Hyper V 활성화
DISM (배포 이미지 서비스 및 관리)은 이미지 관리를위한 통합 Windows 도구입니다. 이 기능을 사용하여 Hyper V를 잠금 해제 할 수도 있습니다.
- [Windows]와 [R] 키를 동시에 누르십시오.
- 실행 대화 상자에 "cmd"명령을 입력하십시오.
- 이제 [Ctrl] + [Shift] 키를 누른 상태에서 Enter 키로 입력을 확인하십시오.
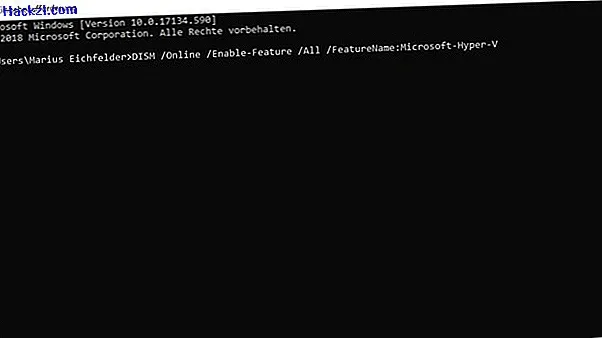
- 새 창에서 "DISM / Online / Enable-Feature / All / FeatureName : Microsoft-Hyper-V"명령을 입력하십시오.
- 활성화가 완료되면 해당 메시지가 창에 나타납니다. 마지막으로 "Y"키를 눌러 PC를 다시 시작하고 설치를 완료하십시오.
Hyper V는 다양한 기능을 제공하지만 특수 가상화 소프트웨어를 사용할 수없는 경우가 있습니다. Hyper V와 VMware의 차이점이 또 다른 실용적인 팁에 정확히 어디에 있는지 보여줄 것입니다.