
호브와 오븐을 별도로 연결하십시오.
쿡탑과 별도의 오븐이있는 경우 둘 다 별도로 연결해야합니다. 그렇지 않으면, 특히 아파트의 오래된 전원 연결에서 퓨즈를 동시에 사용할 때 퓨즈가 끊어 질 수 있습니다. 이 안내서는 오븐과 호브를 개별적으로 연결하는 방법을 단계별로 보여줍니다.
호브와 오븐을 별도로 연결하십시오
230 ~ 400 V 전압의 전기가 호브 및 오븐에 포함됩니다. 이러한 장치는 전기 기술자 만 연결해야합니다. 필요한 모든 안전 예방 조치를 준수하면 다음 지침에 따라 두 장치를 올바르게 연결하는 방법이 나와 있습니다.
- 이것이 작동하려면 호브와 오븐이 3 단계로 분리 된 스토브 연결이 필요합니다. 일부 오븐은 또한 단상으로 만 관리되며 오븐의 케이블을 보면 알 수 있습니다.
- 연결하기 전에 항상 퓨즈를 끄고 실수로 다시 켜지지 않도록하십시오. 스토브 연결 소켓에는 3 개의 퓨즈가 있습니다. 확실하지 않은 경우 잔류 전류 작동 회로 차단기를 끄십시오.

호브를 오븐과 별도로 연결하십시오
오늘날 현대식 주방은 개별적으로 계획하고 가구를 꾸밀 수 있습니다. 많은 호브는 개별적으로 구매할 수 있으므로 자체 전원 연결이 가능하며 아래에 오븐이 추가로 필요하지 않습니다. 호브 연결 방법 :
- 조리대 아래에있는 스토브 연결 소켓의 덮개를 열고 2 극 전압 테스터를 사용하여 모든 연결에 전압이 없는지 확인하십시오.
- 호브에 이미 연결 케이블이있는 경우 다른 쪽 끝을 스토브 연결 소켓으로 연결하십시오.
- 호브에 여전히 연결 케이블이없는 경우 최소 1.5 mm2 와이어 단면의 5 코어 케이블이 필요합니다. 하드웨어 상점에서 원하는 길이로 절단하거나 광택 터미널로 직접 절단 할 수도 있습니다. 양쪽 끝의 벗겨진 와이어에는 더 나은 접촉을 위해 와이어 엔드 슬리브가 제공됩니다.
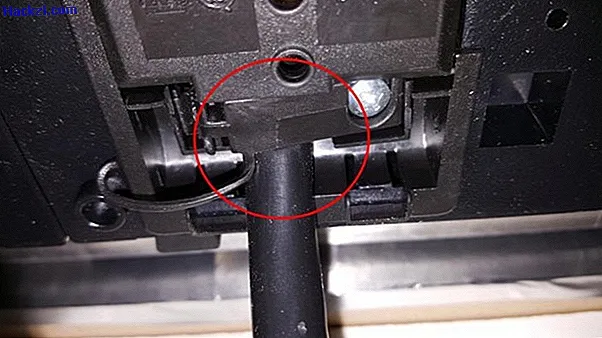
- 각 전선을 호브에 연결하십시오 (케이블이없는 경우). 녹색 / 노란색 보호 도체로 시작하십시오. 그런 다음 스트레인 릴리프를 부착하십시오.
- 케이블의 다른쪽에있는 전선을 스토브 연결 소켓에있는 광택 단자의 올바른 접점에 나사로 고정하십시오. 여기서도 보호 도체가 첫 번째이고 스트레인 릴리프가 마지막입니다. 그런 다음 캔 뚜껑을 닫으십시오.
- 설치를 완료하기 전에 호브의 모든 기능을 확인하십시오.
오븐을 호브와 별도로 연결하십시오
오븐을 더 이상 호브 아래에 설치할 필요는 없지만 편리한 높이로 키가 큰 캐비닛에 통합 할 수 있습니다. 연결선은 오븐을 쉽게 연결하고 캐비닛에 넣을 수있을만큼 길어야합니다.
- 오븐용으로 계획된 두 번째 스토브 연결 소켓의 덮개를 열고 모든 연결에 전압이 없는지 확인하십시오.
- 준비된 케이블이없는 경우 연결 케이블을 오븐에 연결하십시오. 구매시 오븐이 1 단계 또는 3 단계를 거쳐야합니다.
- 연결 케이블의 다른 쪽 끝을 스토브 연결 소켓의 광택 단자에 연결하고 각 전선을 소켓의 연결부에 연결하십시오. 녹색 / 노란색 보호 도체로 시작하십시오.
- 스트레인 릴리프를 조이고 뚜껑을 다시 상자에 놓습니다.
- 오븐을 완전히 설치하기 전에 모든 기능을 확인하십시오.

오븐을 완벽하게 청소하십시오 : 완고한 먼지도 사라집니다.
다음 페이지에서, 구매해야하는 적합한 호브와주의해야 할 사항이 표시됩니다.